
⚡ TL;DR
- Structured sales workflow automation: Configure rules for supported sales-related events.
- Flexible automation: Define triggers, conditions, and actions using the When → If → Then model.
- Better team coordination: Configure notifications for relevant sales activities and ownership changes.
- Organized follow-ups: Create tasks automatically when the configured conditions are met.
- Controlled setup: Test workflows before activating them.
- Execution visibility: Use workflow activity information to investigate whether an automation matched, failed, or completed.
Introduction
Managing sales effectively requires more than generating leads and closing deals. Sales teams must coordinate responsibilities, communicate important updates, create follow-up activities, and ensure that opportunities progress through the pipeline. Sales workflow automation helps teams handle these routine steps consistently.
When these activities depend entirely on manual work, routine tasks can become inconsistent and important steps may be overlooked.
CrmLeaf’s Workflow Automation add-on provides a structured way to automate supported business activities through configurable rules.
Introduced in September 2026, the capability follows a simple When → If → Then model, allowing businesses to define what should happen when a record is created or updated and its configured conditions are satisfied.
For sales teams, this creates opportunities to organize routine processes around lead notifications, task creation, lead assignment, and ownership changes.
The goal is not to replace sales representatives or automate every customer interaction. It is to make repeatable operational activities more consistent, so teams can spend less effort coordinating routine tasks and more time working with prospects and customers.
In this update, we explore the CrmLeaf sales workflow automation experience, its practical use cases, how to configure a workflow, and what teams should know before activating an automation.
What’s New in CrmLeaf Sales Workflow Automation?
CrmLeaf’s Workflow Automation add-on introduces a configurable, no-code approach to handling repetitive CRM operations. Rather than manually performing the same supported action after every qualifying event, administrators can define a rule once and let the system execute it when its conditions are satisfied.
The sales use cases are particularly relevant to teams that regularly handle new leads, assign ownership, coordinate follow-ups, and transfer responsibility between sales and onboarding.
The automation experience includes:
- A workflow library for exploring available automation options.
- Configuration options for triggers, conditions, and actions.
- Customization of available workflows where supported.
- The ability to build an automation from scratch.
- Testing functionality to help validate a configuration.
- Activity information to help users investigate workflow execution.
The exact options available depend on the workflow, record type, account configuration, and enabled permissions.
Important: Workflow Automation is an add-on that requires administrator enablement. CrmLeaf’s official documentation states that building a rule alone does not mean it will run; the required functionality must also be enabled for the account.
For configuration and availability details, see the official CrmLeaf Workflow Automation Help Center.
CrmLeaf Sales Automation Templates: Eight Ways to Streamline Sales Operations
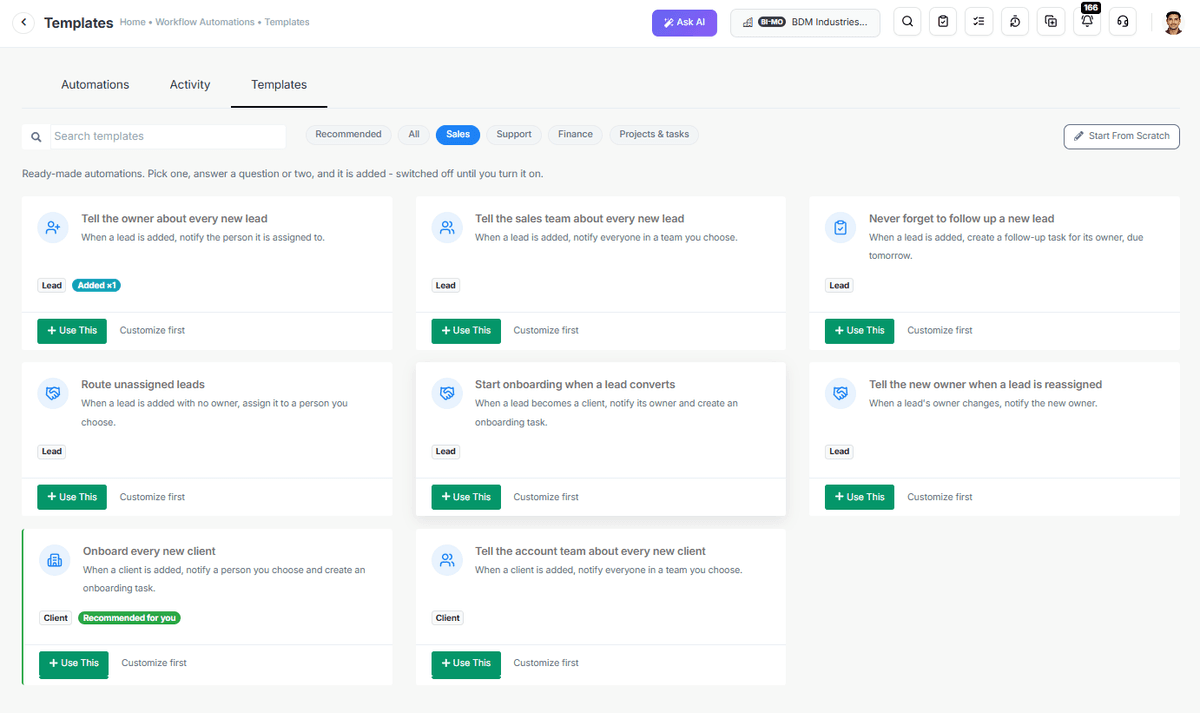
CrmLeaf’s ready-made templates help sales teams automate routine activities without building every workflow from scratch. Each template addresses a specific operational requirement, from notifying sales representatives about new leads to coordinating client onboarding.
1. Tell the Owner About Every New Lead
The challenge: Sales representatives may not immediately notice new leads assigned to them, particularly when several inquiries arrive throughout the day.
How CrmLeaf helps: When a new lead is added, the workflow notifies the person assigned to that lead.
Example: A new prospect enters the CRM and is assigned to Priya. The configured automation notifies Priya about the new lead.
Expected benefit: Keeps lead owners informed about incoming prospects and helps establish a consistent lead-handling process.
2. Tell the Sales Team About Every New Lead
The challenge: Sales managers and team members may lack visibility into newly created leads when updates depend on manual communication.
How CrmLeaf helps: When a new lead is added, the workflow notifies everyone in a selected team.
Example: A new inquiry enters the CRM, and the selected sales team receives a notification.
Expected benefit: Improves team awareness and coordination around incoming sales opportunities.
Businesses should select notification recipients carefully to avoid unnecessary or duplicate messages.
3. Never Forget to Follow Up on a New Lead
The challenge: Sales representatives managing multiple prospects may forget to create follow-up activities.
How CrmLeaf helps: When a lead is added, CrmLeaf creates a follow-up task for its owner, with the template specifying that the task is due tomorrow.
Example: A prospect submits an inquiry today, and the assigned salesperson receives a follow-up task due the next day.
Expected benefit: Helps sales representatives organize their next actions and reduce the risk of missed follow-ups.
A task’s due date should not be confused with a delayed automation trigger. The workflow responds to supported record events rather than waiting a specified number of days before executing an action.
4. Route Unassigned Leads
The challenge: New leads can remain unassigned when ownership depends on manual intervention.
How CrmLeaf helps: When a lead is added without an owner, the workflow assigns it to a person selected during configuration.
Example: A new lead enters the CRM without an assigned salesperson. CrmLeaf assigns the lead to the designated person.
Expected benefit: Helps reduce unassigned leads and establishes clearer responsibility for incoming inquiries.
The assignment rule should reflect the business’s actual lead distribution process.
5. Start Onboarding When a Lead Converts
The challenge: When a prospect becomes a client, the business needs to coordinate the transition from sales to onboarding.
How CrmLeaf helps: When a lead becomes a client, the template notifies the lead owner and creates an onboarding task.
Example: A prospect converts into a client, triggering a notification and an onboarding task for the next stage of the customer journey.
Expected benefit: Supports a more organized sales-to-onboarding handoff and gives the responsible team a defined next step.
The workflow initiates the configured actions; the team remains responsible for completing onboarding and delivering the agreed customer experience.
6. Tell the New Owner When a Lead Is Reassigned
The challenge: When a lead changes hands, the new owner may not immediately know that responsibility has been transferred.
How CrmLeaf helps: When a lead’s owner changes, the workflow notifies the new owner.
Example: A lead is transferred from Priya to Rahul. Rahul receives a notification about the reassignment.
Expected benefit: Improves communication during handovers and helps clarify responsibility for managing the lead.
7. Onboard Every New Client
The challenge: Businesses may handle onboarding inconsistently when new client records are added without a defined next step.
How CrmLeaf helps: When a new client is added, the workflow notifies a person of your choice and creates an onboarding task.
Example: A new client record is created, the designated person receives a notification, and an onboarding task is generated.
Expected benefit: Helps establish a repeatable onboarding process for newly added clients.
This template is distinct from the lead-conversion template: it responds to a new client being added, while the conversion template addresses the transition from lead to client.
8. Tell the Account Team About Every New Client
The challenge: Account team members may not receive timely information when a new client is added to the system.
How CrmLeaf helps: When a client is added, the workflow notifies everyone in a selected team.
Example: A new client record is created, and the relevant account team receives a notification.
Expected benefit: Keeps account team members informed and supports coordination across client-facing activities.
Together, these eight templates help businesses organize common sales and client-management activities through configurable workflows.
How CrmLeaf Sales Workflow Automation Works
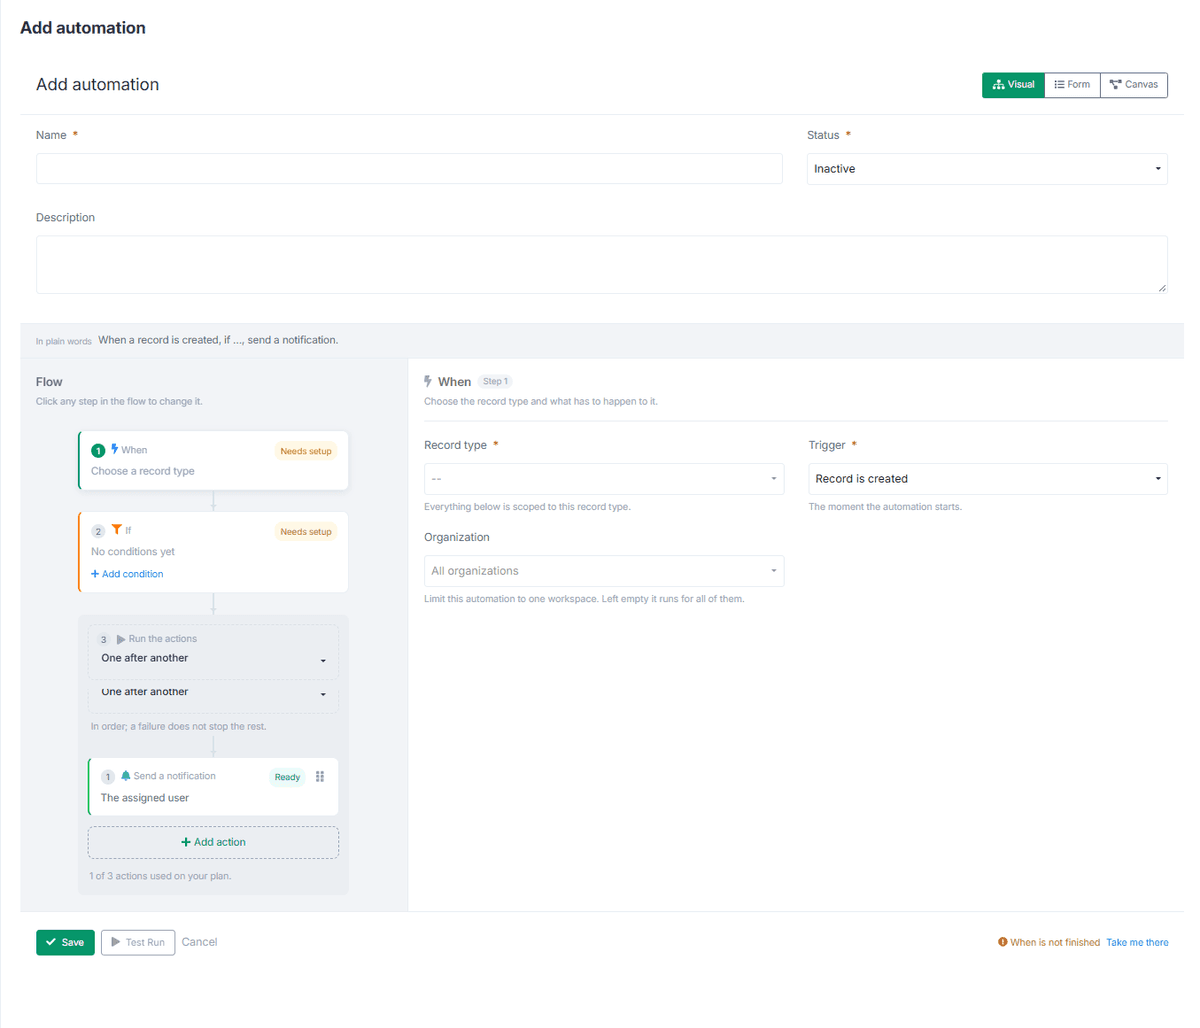
CrmLeaf uses a simple three-part structure: When → If → Then.
1. When: Select the Trigger
The trigger determines when the workflow should be evaluated. CrmLeaf supports record creation and record update triggers for supported record types.
For example, a sales team can configure a workflow that responds when a new lead is created.
2. If: Define the Conditions
Conditions determine which records qualify for the workflow.
A team might want an automation to run only when a lead has no assigned owner or when a deal reaches a particular stage.
CrmLeaf evaluates multiple configured conditions using AND logic, meaning all conditions must match. OR logic is not supported, so alternative scenarios may require separate workflows.
3. Then: Configure the Actions
Actions define what happens when the trigger and conditions are satisfied.
Depending on the record type and enabled capabilities, available actions include:
- Sending an internal notification.
- Sending an email.
- Creating a task.
- Updating a supported field.
- Assigning a record to a user.
- Calling an outbound webhook.
Not every action is available for every record type. Review the options presented in the workflow configuration before designing the process.
Example: Sales Workflow Automation for New Lead Follow-Up
When: A lead is created.
If: The lead meets the configured conditions.
Then: CrmLeaf creates a follow-up task for the appropriate owner.
This workflow can establish a consistent next step when a new lead enters the sales process.
Sales Workflow Automation Use Cases: How Businesses Can Use CrmLeaf
The value of automation depends on the business problem being addressed. These examples demonstrate how CrmLeaf’s documented capabilities can support common sales operations.
1. Sales Workflow Automation for Lead Assignment
The challenge: New leads can remain unassigned when responsibility depends on manual intervention.
How CrmLeaf helps: Configure a workflow to identify newly created leads without an owner and assign them to a designated user. The assignment rule should reflect the organization’s actual process.
Expected benefit: Clearer responsibility for incoming leads and a more consistent assignment process.
Example workflow:
When a lead is created → If its owner is empty → Assign it to the configured user.
2. Sales Workflow Automation for Lead Follow-Ups
The challenge: Sales representatives may forget to create a follow-up task while managing multiple prospects.
How CrmLeaf helps: Configure an automation to create a follow-up task when a lead is created. The due date and assignee should match the team’s follow-up policy.
Expected benefit: A more structured process for organizing the next action for a lead.
Example workflow:
When a lead is created → Create a follow-up task with the appropriate due date and owner.
A task reminder is not the same as a delayed automation trigger. CrmLeaf executes workflows in response to supported record creation or update events, rather than waiting a specified number of days before running an action.
3. Sales Workflow Automation for Team Notifications
The challenge: Sales representatives or managers may not receive timely internal updates about new leads.
How CrmLeaf helps: Configure a notification to the assigned lead owner or selected team when a qualifying lead is created.
Expected benefit: Improved visibility into incoming lead activity and clearer internal communication.
Businesses should choose notification recipients carefully to avoid unnecessary or duplicate messages.
4. Lead Reassignment and Ownership Changes
The challenge: When a lead changes hands, the new owner may not immediately know that responsibility has been transferred.
How CrmLeaf helps: Configure a workflow to notify the new owner when a lead is reassigned.
Expected benefit: Clearer communication during handovers and better visibility into responsibility changes.
5. Sales Workflow Automation for Onboarding Handoffs
The challenge: When a lead converts into a client, the business needs to initiate the next stage of the customer journey.
How CrmLeaf helps: Configure a workflow that responds to the relevant conversion event by notifying the lead owner and creating an onboarding task, where supported by the available configuration.
Expected benefit: A more structured transition from sales to onboarding, with a defined next step for the responsible team.
The automation initiates the configured actions; the team remains responsible for completing onboarding and delivering the agreed customer experience.
6. Standardizing Sales Operations
The challenge: Different sales representatives may handle routine administrative tasks differently.
How CrmLeaf helps: Establish consistent rules for supported events, notifications, assignments, and task creation.
Expected benefit: More repeatable processes and clearer expectations for routine sales activities.
These are operational use cases, not guaranteed performance outcomes. Results depend on the quality of the configuration and how well the workflow matches the business process.
How to Create or Customize Sales Workflow Automation in CrmLeaf
Before creating a workflow, identify the repetitive activity you want to improve. Define the event that should start the process, the records that qualify, and the action that should follow.
Step 1: Open Automations
Sign in to CrmLeaf and navigate to the Automations section.
Confirm that the Workflow Automation add-on and the required account-level permissions are enabled. If the capability has not been enabled, an administrator may need to coordinate activation with CrmLeaf support.
Step 2: Explore the Available Options
Open the Templates section and explore the available categories, including Sales, where shown in the interface.
Use search or category navigation to find a relevant workflow. Alternatively, select Start From Scratch if you need to configure a custom rule.
Step 3: Select or Customize a Workflow
Choose a suitable existing workflow and review its description and configuration.
Customize the available settings to fit your process. If you start from scratch, define the record type, trigger, conditions, and actions yourself.
Step 4: Configure the Trigger
Select the supported record type and choose whether the workflow should be evaluated when a record is created or updated.
For sales use cases, the appropriate event might involve a new lead or a relevant change to an existing record.
Step 5: Set the Conditions
Specify which records qualify for the workflow.
For example, a lead-assignment rule can check whether the owner field is empty. If you configure multiple conditions, remember that all of them must match because CrmLeaf uses AND logic.
Step 6: Configure the Actions
Select the required actions and review their settings.
Depending on the workflow, this may involve choosing notification recipients, defining task details, selecting an assignee, or configuring another supported operation.
Confirm that the action is appropriate for the record type and enabled capabilities.
Step 7: Test the Workflow
Use the available Test Run functionality to check the configuration.
Review the results and correct any issues before activation. Where necessary, validate the behavior using an appropriate test record and the relevant real-world event.
Step 8: Save and Activate
Save the workflow and enable it when you are satisfied with the configuration.
Saving a rule is not the same as activating it. Confirm that the automation is switched on and that the required account-level functionality is enabled.
Step 9: Verify the Outcome
Confirm that the expected action occurs when a qualifying event takes place.
Review the activity information where available. If the action did not occur, investigate the trigger, conditions, action settings, permissions, and workflow status.
Monitor Sales Workflow Automation Activity and Troubleshoot Issues
Creating a workflow is only part of the process. Teams also need to understand whether the workflow was evaluated and what happened afterward.
CrmLeaf’s Workflow Automation activity information can help users investigate execution results.
Depending on the recorded activity, outcomes may indicate that a workflow matched, did not match, failed, was skipped, or was still running.
Use this information to investigate common questions:
- Why did the workflow not run? Check whether the record event occurred after activation and whether the trigger and conditions matched.
- Why was no action performed? Review the workflow configuration, available action settings, permissions, and recorded outcome.
- Why did an automation run for one record but not another? Compare the records against the configured conditions.
- Why did an update not trigger the expected behavior? Review whether the update involved the fields relevant to the workflow’s conditions.
CrmLeaf’s documented automation model also has limitations that affect troubleshooting. Workflows respond to supported record creation and update events; they are not scheduled jobs, and they do not automatically process historical records simply because a rule has been enabled.
For detailed instructions, refer to the official CrmLeaf Workflow Automation documentation.
Best Practices for Reliable Sales Workflow Automation
Define Clear Ownership Rules
Determine who should own new leads, receive notifications, and complete follow-up tasks. Clear responsibility rules help prevent confusion during handovers.
Keep Rules Focused
Start with one clearly defined business requirement. A focused workflow is easier to test, explain, and maintain.
Avoid Duplicate Actions
Review related automations before activation. Overlapping rules can generate duplicate notifications or tasks.
Test Conditions Carefully
Verify that the trigger and all configured conditions reflect the intended business scenario. Test records that should qualify as well as records that should not.
Understand the Trigger Limitations
CrmLeaf workflows use supported record creation and update events. They do not provide scheduled or delayed triggers, and they do not automatically process old records after activation.
If your business requires a future action after a waiting period, do not assume that creating a task with a due date schedules the workflow itself.
Review Activity Regularly
Check workflow activity and investigate failures or unexpected results. Revisit rules when sales responsibilities, record fields, or business procedures change.
Keep Human Judgment in the Process
Automation can organize routine activities, but sales representatives remain responsible for understanding customer needs, managing conversations, and making appropriate decisions.
Streamline Your Sales Workflow Automation With CrmLeaf
Consistent sales operations depend on clear ownership, timely communication, and well-defined processes. When routine activities rely entirely on manual work, teams may face unnecessary administrative effort and inconsistent execution.
CrmLeaf sales workflow automation provides a structured way to configure supported workflows around sales operations. By defining triggers, conditions, and actions, businesses can organize lead notifications, follow-up tasks, assignment rules, and sales handoffs.
The most effective approach is to start with a clear business requirement, configure the appropriate workflow, test it carefully, and review its activity over time.
Evaluate how CrmLeaf fits your sales process and discover the available capabilities for your team.